Tech Support

Airborne Installation Guide

Driver Installation : 

Airborne is an Host less device. When the Host less is plug into the Laptop/PC for the first time, Laptop/PC will automatically detect the device and install RNDIS driver in the background without any manual intervention.

It takes a few of minutes to complete the process. Below please find the setup example running on windows 7.

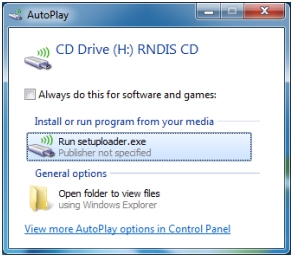
Step-1: Once the Host less USB device is plugged onto Laptop/PC for the first time, the error message to the left will be displayed, please ignore it

1

Step-2: An USB mass storage will appear, on my computer open the drive and RUN setup

2

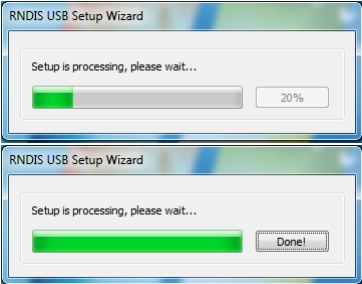
Step-3: Windows will install all the required driver automatically. Wait until install the driver installation done.

3

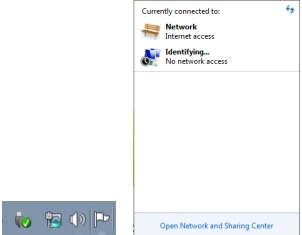
Step-4:  Once the Host less USB device installation done identifying network connection may appear in the taskbar

4

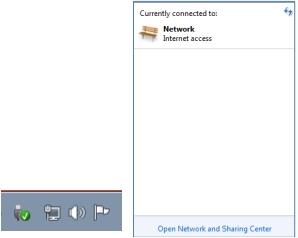
Step-5: Once the busy sign disappear and the LAN status show connected in the taskbar now can go for the next process

5

Note: the above installation steps may vary depending on the OS platforms and Version

User interface : 

Step-1:

•Connect Airborne Modem to PC with USB cable.

• Wait for a minute.

•Open an and type 192.168.10.1 and enter.

Following window will come

Step 1

Note: Internet Explorer-Version 9 or Mozilla Firefox- Version 12.0 or Google Chrome- Version 22.0.1229.94 m is tested and can work

Step-2:

•Input user name & password, select package type

Step 2

By default Monthly package is selected. If the user is using monthly package then select monthly package  and If the user pre Pay then change selection to Pre Pay.

Step-3:

•Make sure all the check box are marked as checked.

Step 3

By default Auto connect ,Auto reconnect on link lost and Auto retry when failed  is checked, Do not make any changes on the check box.

Step-4:

•If authentication is successful then network connection will be establish.

Step 4

After successful connection Device status will show as “Connected” and an IP will be appear at the below

Step-5:

•RF information will be visible on the landing page.

Step 5

Step-6:

Step-6:

•Playground is ready for play.

Step 6

After successful complete above process the playground is ready for play.

•The device is not working in Windows XP service pack -2 due to OS limitation.

So it is recommended to install service pack -3 (can be downloaded from Microsoft site) by the Sales support/OLS engineer during the first installation.

•It is mandatory to make sure that Pre Pay users domain name is “@qubeeprepay.com.bd” and Monthly Package users domain is “@qubee.com.bd”.

Thanks…….

Shuttle Host less Installation

When the Host less is plug into the Laptop/PC for the first time, Laptop/PC will automatically detect the device and install RNDIS driver in the background without any manual intervention.

It takes a few of minutes to complete the process. Below please find the setupexample running on windows 7.

Step-1: Once the Host less USB device is plugged onto Laptop/PC for the first time,  the error message to the left will be displayed, please ignore it

1

Step-2: An USB mass storage will appear, click on RUN setup loader and the RNDIS  driver will be automatically install now click done

2_a2_b

Step-3:  Once the Host less USB device installation done identifying network connection may appear in the taskbar

3

Step-4: Once the busy sign disappear and the LAN status show connected in the taskbar now can go for the next process

4

Note: the above installation steps may vary depending on the OS platforms and version

User interface :

Step-1:

•Connect Shuttle Modem to PC with USB cable.

• Wait for a minute.

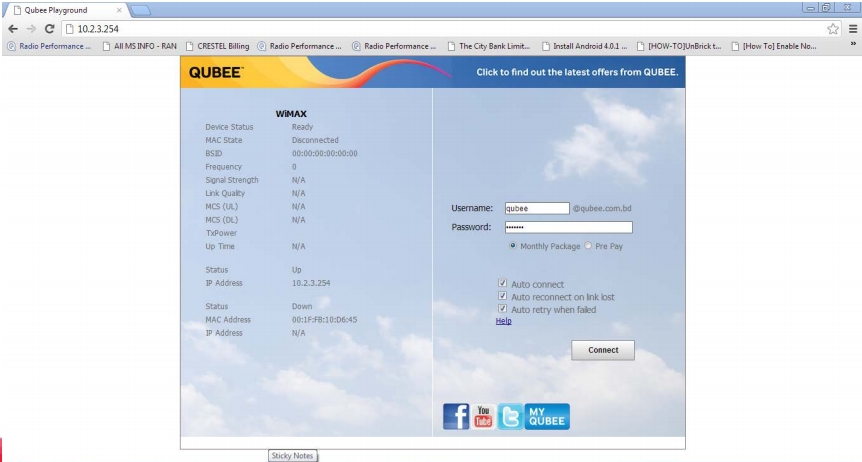
•Open an and type 10.2.3.254 and enter.

Following window will come

step 1

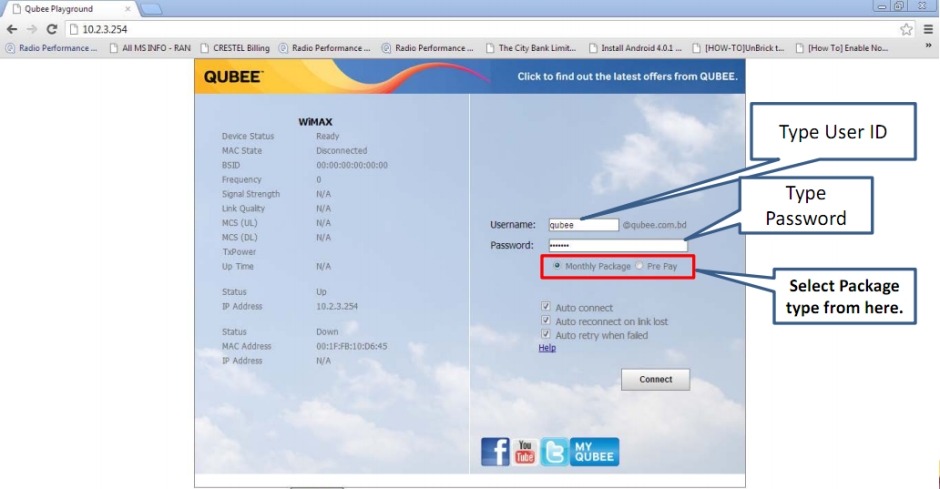
Step-2:

•Input user name & password, select package type

step 2

By default Monthly package is selected. If the user is using monthly package then select monthly package and If the user pre Pay then change selection to Pre Pay.

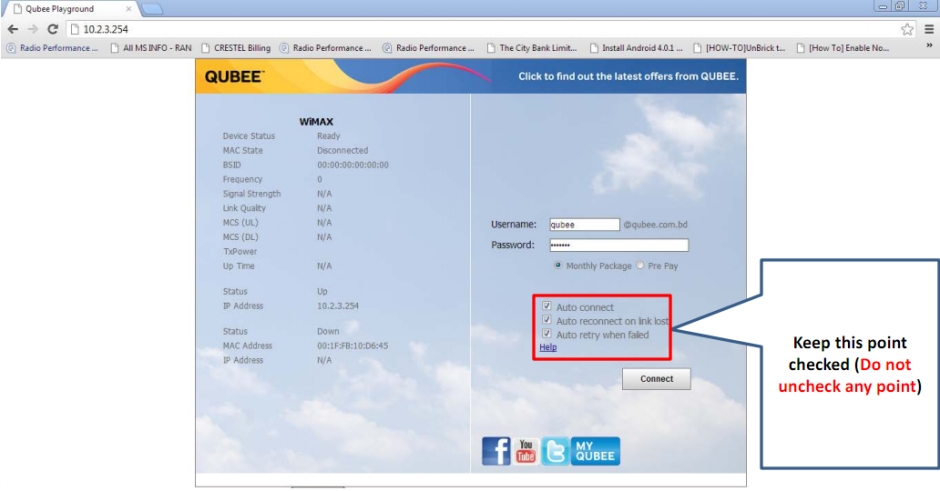
Step-3:

•Make sure all the check box are marked as checked.

step 3

By default Auto connect, Auto reconnect on link lost and Auto retry when failed is checked, Do not make any changes on the check box.

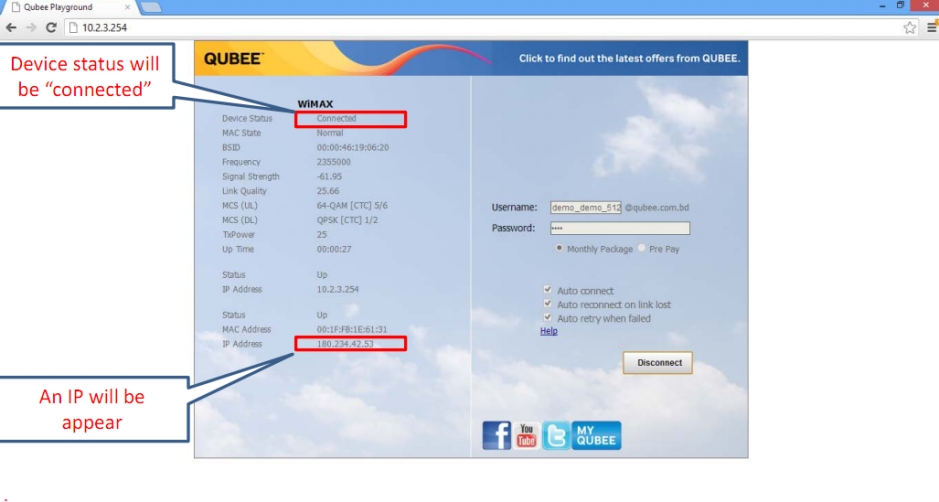
Step-4:

•If authentication is successful then network connection will be established.

step 4

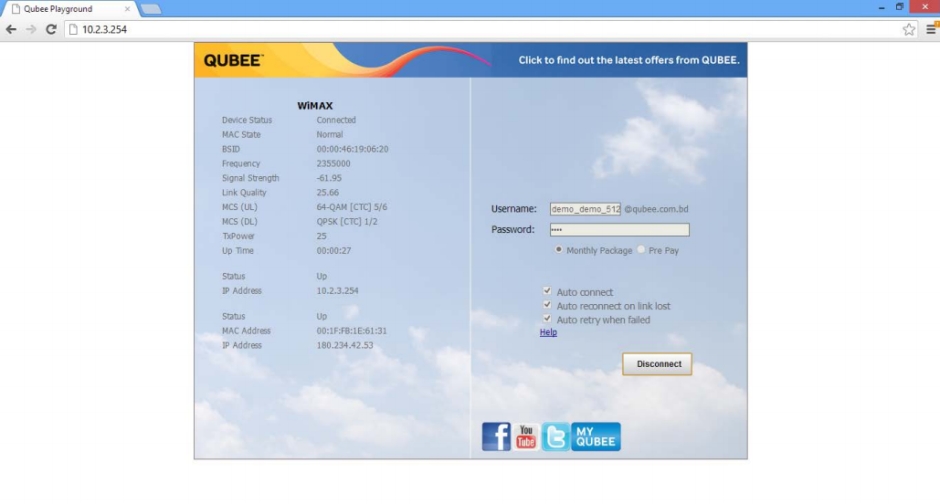
After successful connection Device status will show as “Connected” and an IP will be appear at the below

Step-5:

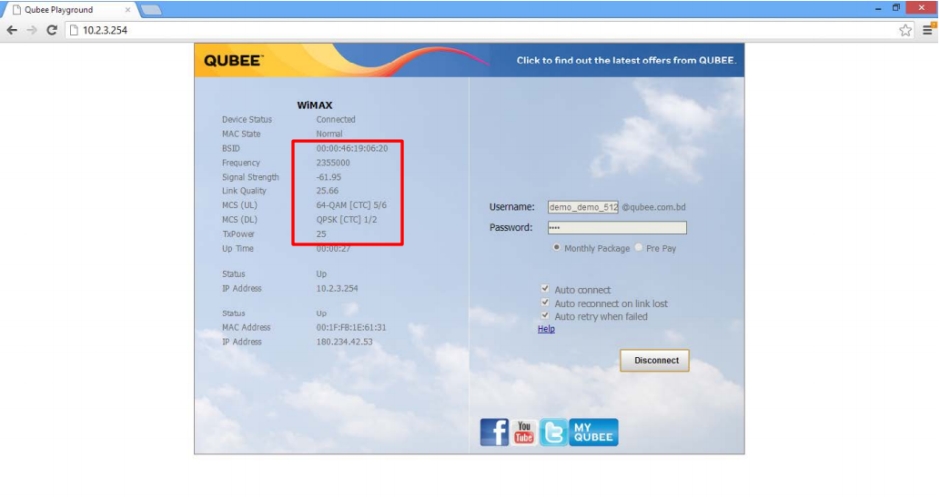
•RF information will be visible on the landing page.

step 5

After successful connection BSID, Frequency, Signal strength, Link quality and MCS  information will be visible on the landing page

Step-6:

•Playground is ready for play.

step 6

•The device is not working in Windows XP service pack -2 due to OS limitation.

So it is recommended to install service pack -3 by the OLS engineer during the first

installation.

•It is mandatory to make sure that Pre Pay users domain name is

“@qubeeprepay.com.bd” and Monthly Package users domain is “@qubee.com.bd”.

Installtion Process of ROVER

Open a web browser and browse IP  192.168.1.1


Click login then user name and user name and password option will show with dynamic realm.


User just provide the user name(aaaaa) without realm. Then just click save.  Monthly  package is selected by default.


For Pre pay user then select pre pay and provide just user name without realm then click save (When prepay domain will open). Now the existing  Pre Pay user will also select monthly package to connect with the network .


Then you will find the device status

Then go to connection tab then you can find device status, BSID, Frequency, Signal strength, Link quality, MAC address .


Thanks. …

Installation Process Of Myfi

Open a web Browser & browse IP address as 192.168.0.254  . Then the following window will appear

If above page does not appear check:
Wire connectivity
LAN configuration
All four LEDs are blinking
Make sure the default password (admin) is changed by the user or not .

Click on “Change adapter settings” or Local Area Connection

Make sure all other Local Area Connection are disables and Right Click on desired Local Area Connection , Then select ” Properties ”

Select  ” Internet Protocol Version 4 ”   then select ” Properties”  .

Check Obtain an IP and DNS server automatically are selected .

Installation Process : 

Give user id: system & password: system for Authentication .

Note: user id: system & password: system gives access in admin mode. We need access to admin mode for “Authentication”

After login version information page will appear, Click on WiMAX for Authentication

click  ” Setting ”

PKM: Enable
EAP Type: EAP-TTLS-MSCHAPV2
Inner NAI ID: QUBEE Username
Inner NAI password: User password
Outer NAI: modemMAC@qubee.com.bd
Then click on “Save

Note: if customer does not use Outer NAI then customer will face authentication problem

Click Yes then reboot starts

Wait till the Reboot is complete;
Note: when reboot is complete customer will be redirected to interface login page

How to Temporarily Disable your Anti-virus

AVAST
Right- click on the avast! icon in system tray (looks like this: Posted Image but orange in color starting with v5). Select avast! shields control and there will be options to disable avast for 10 minutes, 1 hour, until the computer is restarted or permanently.

AVG 8
Open the AVG 8 Control Center, by right-clicking on the AVG 8 icon on task bar.

  • Click on Tools.
  • Select Advanced.
  • In the left hand pane, scroll down to “Resident Shield“.
  • In the main pane, deselect the option to “Enable Resident Shield.”
  • To re-enable AVG 8, please select “Enable Resident Shield” again.

AVG 8.5
Please open the AVG 8.5 Control Center, by right clicking on the AVG icon on task bar.

AVG 9.0
Please refer to the instructions provided in AVG FAQ 2429: How to temporarily disable AVG Free Edition 9.0.

AVG 2011
Open the AVG 2011 Control Center, by right-clicking on the AVG icon on task bar.

  • Click on Open AVG User Interface.
  • On the Menu Bar, click on Tools, then click Advanced Settings.
  • In the screen which opens, scroll down to Temporarily disable AVG protection.
  • Click on it to highlight and in the right hand pane, check the box for Temporarily disable AVG protection.
  • Click Apply.
  • In the next screen which opens, select 15 minutes from the drop down menu, then click the Disable real time protection button and click OK.
  • To re-enable, just check Enable on the main GUI interface. You may also need to click Fix (enable becomes Fix if all components do not start).

AVG FAQ 3857: Disabling AVG 2011 temporarily
AVG FAQ 3902: Disabling Specific AVG components

AVIRA ANTIVIR
Please navigate to the system tray on the bottom right hand corner and look for an open white umbrella on red background (looks to this: Posted Image)

  • right click it-> untick the option AntiVir Guard enable.
  • You should now see a closed, white umbrella on a red background (looks to this: Posted Image )

BIT DEFENDER

  • Double click on the system icon for Bit Defender.
  • When the Bit Defender window appears, move mouse arrow to the left side and click >> Virus Shield.
  • Move mouse arrow to the black check by Virus Shield is enabled and click.
  • The black works will change to red, >> Virus Shield is disabled.
  • Move mouse arrow to the top right corner and click the down arrows.
  • Bit Defender is now inactive.
  • To enable Bit Defender, do the same steps except click to enable.

CA Internet Security Suite 2010

  • To turn off the Firewall, right-click on the CA Shield icon in the system tray, click My Internet, then click Disable Firewall.
  • To turn it back on, right click system tray icon, click My Internet, then click Enable Firewall.


  • To temporarily disable the Antivirus, right-click the CA Shield icon in the system tray, click My Computer, then click Enable Snooze.
  • Enter the snooze time in minutes (up to 999, approx 16 2/3 hours) in the box and click Snooze.
  • To end snooze, follow the same procedure and click Wake Now on the page for entering snooze time.
  • To disable Antivirus on a longer basis, double-click the CA Shield icon in the system tray.
  • When Security Center comes up, click Update Settings in the My Computer tab.
  • Then click the red X next to Auto Scan.
  • To re-enable, follow the same procedure and click the green checkmark.

ESET NOD32 ANTIVIRUS V4

  • Double click on the system tray icon: Posted Image on the bottom right hand corner.
  • Select Disable real-time file system protection.
  • A popup will ask “Are you sure you want to disable…protection?”
  • Click “Yes” to disable the Antivirus guard.

ESET SMART SECURITY

  • Double click on the system tray icon: Posted Image to open the main application window.
  • Or via Start >> All Programs >> ESET >> ESET Smart Security.
  • Click on Setup >> Antivirus and antispyware >> Temporarily disable Antivirus and antispyware protection.
  • When prompted to confirm temporarily disable select Yes.
  • Note: Protection will be automatically started after a system reboot.

F-SECURE ANTIVIRUS
Please navigate to the system tray on the bottom right hand corner and look for a blue Posted Imagesign.

  • right click it-> select Unload.
  • The F-Secure sign should now be surrounded by a red striked through circle (looking like this: Posted Image )

F-SECURE CLIENT SECURITY
Please refer to this User Guide (page 67, Real-time scanning settings}

KASPERSKY ANTIVIRUS
Please navigate to the system tray on the bottom right hand corner and look for a Posted Imagesign.

  • right click it-> select Pause Protection.
  • click on -> By User Request
  • a popup will claim that protection is now disabled and a sign like this: Posted Image will now be shown.

MCAFEE ANTIVIRUS
Please navigate to the system tray on the bottom right hand corner and look for a Posted Imagesign.

  • Right-click it -> chose “Exit.”
  • A popup will warn that protection will now be disabled. Click on “Yes” to disable the Antivirus guard.

MCAFEE SECURITY CENTER 7.1
Please navigate to the system tray and double-click the taskbar icon to open Security Center.

  • Click Advanced Menu (bottom mid-left).
  • Click Configure (left).
  • Click Computer & Files (top left).
  • VirusScan can be disabled in the right-hand module and set when it should resume or you can do that manually later on.
  • Do the same via Internet & Network for Firewall Plus.

Instructions to disable McAfee Security

MICROSOFT SECURITY ESSENTIALS

  • Open MSE and go to Settings > Real Time Protection.
  • Then uncheckTurn on real time protection“.
  • Exit MSE when done.

NORTON ANTIVIRUS (by Symantec)
Please navigate to the system tray on the bottom right hand corner and look for a Posted Imagesign.

  • right-click it -> chose “Disable Auto-Protect.”
  • select a duration of 5 hours (this assures no interference with the cleanup of your pc)
  • click “Ok.”
  • a popup will warn that protection will now be disabled and the sign will now look like this: Posted Image

NORTON 360

  • Right-click the Norton 360 Premier Edition icon in the system tray and select Disable Antivirus Automatic-Protect.
  • You will get a new dialog box with five options: 15 minutes, 1 hour, 5 hours, Until system restart, Permanently.
  • Choose 5 hours.

NORTON INTERNET SECURITY 2008
Please refer to these instructions.

NORTON ANTIVIRUS CORPORATE EDITION
Please refer to the instructions provided in the Norton AntiVirus Corporate Edition User’s Guide under the section Turning File System System Protection off temporarily.

PC TOOLS THREATFIRE

  • Right-click on ThreatFire’s icon near the clock (it’s an orange flame) and select Suspend.
  • When you see that the icon has turned from an orange flame to a blue icon with an orange strip in the middle, ThreatFire has been temporarily disabled.

SYMANTEC ENDPOINT PROTECTION
Right click on the icon in the taskbar notification area & select “Disable Symantec EndPoint Protection“.

Posted Image

Activities At The Time Of Recharge

Plug-in your modem to your computer (Gigaset indoor to LAN port / SEOWON Dongle/ Shuttle to USB port) In case of Shuttle you will see the following connection manager.

1. Open a browser (e.g. Internet Explorer, Firefox, Safari, Opera, Google Chrome etc.)
2 . Type any URL in the browser (Example: http://www.qubee.com.bd) and you will be redirected to a login portal automatically.
3.You are in Log in portal now.
Type the user name and password (collected from flagship during purchase) to log in/recharge account.

5.   Click “recharge account” to top-up your account using the scratch card. You will be redirecting the login portal to recharge portal automatically.


•You are in recharge portal now
Use the same user name and password (collected from flagship) to log in the recharge portal.

Choose Recharge account from the menu bar and click recharge.


Now use SL no. and PIN no. (From the scratch card) for recharging your account

> Submit

• It provides the information about the recharge balance and the new expiry date of that balance


LAN Configuration For Windows XP

Step 1 : Go to Start — Control Panel —– Network Connection—– Local Area Connection—- then  Properties Of Local Area Connection


Step 2 : Select Internet Protocol TCP/IP   and Go properties of that .


Step 3 :  Select Obtain an IP Address Automatically and Obtain an DNS server Automatically  Or Give the Following DNS


Thanks ……….

LAN Configuration For Windows Vista


STEP 1 : Go to ” Control Panel  ” From start menu.


Step 2 : Go to ” Network and Sharing Center  ”


Step 3 :  Then Go to  ” Manage network Connection  ”


Step 4 : Then Go to  “   Local Area Connection  “


Step 5 : Go to properties of Local Area Connection


Step 6 :  Uncheck “ Internet Protocol Version 6 “


Step  7 : Select  “ Internet Protocol Version 4 “


Step 8:  Go to properties of “ Internet Protocol Version 4 “  and click obtain an IP address automatically and click obtain an DNS address automatically.


Thanks ……


LAN Configuration For Windows 7

Step:-1 Right click the network connection and click “Open Network and sharing Center”


Step 2: Click on the Local e connection name can vary in clients’ pc)


Step3: Then select properties


Step 4:  Then selct TCP/IPV4 > click properties

Step 5:  Now set the IP address like below.Then click ok> reconnect the modem.


Thanks ……